Internet Radio
I put a computer in a vintage vacuum-tube radio to combine modern streaming with the sound and feel of listening to the radio in the 1930s.
Origins
On a biking trip with my dad in late 2016, I was describing my SoundByte project, and we got to thinking about what other experiences you could create by adding an ultra-small computer to a traditionally non-digital product. My dad suggested we could retrofit an old radio, and we both got pretty excited about the project, especially if we could retain as much of the original look and feel of the radio.
Borrowing the physical interface concept that I liked from the SoundByte, I built the experience around "tuning" between different "stations" - turning to a specific portion of the dial would activate specific programs. For example, you could tune to a certain station to stream a favorite Pandora station, or play a spotify playlist, or anything else a computer can do, like reading out your calendar for the day.
About the radio
We purchased a vintage Philco 38-12 Compact Table Model radio off of eBay - the radio was originally sold in 1938, but had been restored to great condition, and worked great. We selected this one because it looked great and fit well on a desk (about the size of a large toaster). I also wanted a radio with just two knobs - one for volume, and one for tuning - to keep the interface as simple as possible. This same concept could retrofit just about any radio, but I liked the look of this one, and loved the vintage sound from the vacuum tube amplifier.
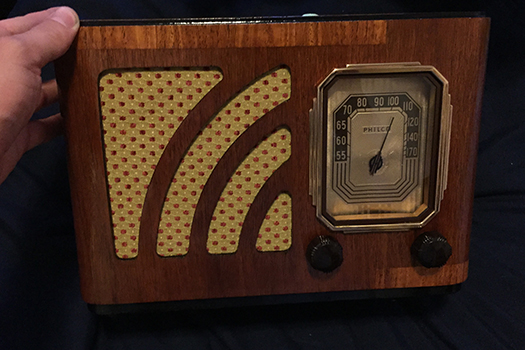
The Philco 38-12, beautifully restored
The radio is designed to sound and feel as authentic as possible. When tuning between stations, static is blended into the audio stream proportional to your distance from each station, and the radio keeps track of timing to maintain the illusion that a station has “kept playing” while you were away, just as with actual radio. The audio output from the computer is fed through the radio’s original vacuum tube amplifiers to give a pleasant warmth to the sound. The radio’s original tuning condenser is the input mechanism, so changing stations has the same satisfying mechanical resistance as the original. The combination of these small touches makes a big difference in matching people’s intuitive expectations of how the radio “should” work.
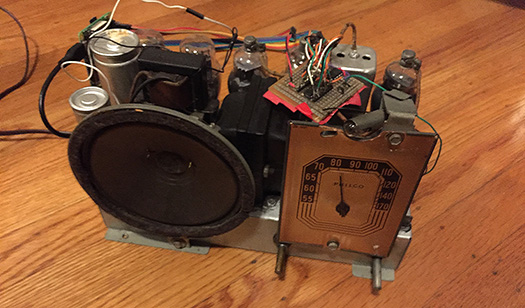
Inside the radio is a Raspberry Pi 2 model B, along with some additional ICs to read in the currently selected station. One of the first versions I made used a C.H.I.P., but I switched to a multi-core computer because the various programs running concurrently on the single C.H.I.P. CPU caused some stuttering in the streaming audio. Fortunately, the radio has a continuous power source (it's plugged in to the wall), and there was ample space in the radio to fit a computer, so when choosing components I didn’t have to worry about size or power consumption.
I configured the radio with 15 distinct radio stations - most of them play music off of different Pandora stations, but I also added a “old timey radio addresses” and “old timey sports broadcasts,” because listening to things like Martin Luther King’s “I Have a Dream” speech on a vintage radio is spine-tinglingly cool. One of the stations also is set up with AirPlay, so you can stream music from your computer or phone.
Personally, I love that I can just turn on the radio, turn the dial to match my mood, and hear music I like. The analog controls make the radio simple to use - there are no lists to scroll through or buttons to tap, but in exchange, you don’t have as much control. It’s been interesting to hear people ask “Can you skip to the next song?” - people have gotten accustomed to being able to play any song any time, rather than listening to whatever is currently playing on the radio.
Building the radio
After getting the radio, I was pleasantly surprised that it worked well right out of the box. It took me a bit to find an AM radio station that was powerful enough for the radio to pick up - I ended up using a makeshift antenna to get a better signal - but once I did the radio sounded great. My first goal was to get a basic lay-of-the-land and figure out where I was going to hook up the computer, so I slid the internals out of the case and was surprised to see this:
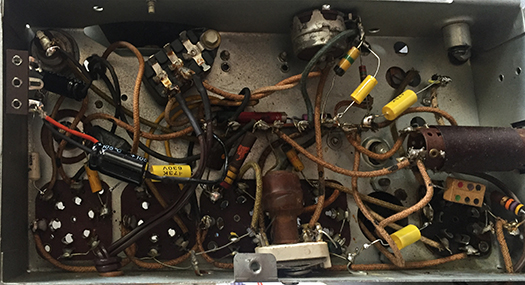
Circuits in the 1930's were a mess
The circuitry in the radio looked nothing like the black-ICs-on-green-circuitboard that I was used to from other projects. It took me a while to even understand what all the components were, let alone how they were wired. Even more surprising was that the voltage on the terminals ranged from -30V to 290V, so I wasn’t even sure if I’d even be able to connect in the audio without frying the computer. I spent a few days with the radio’s schematics, poking around with my oscilloscope until I had a fairly good understanding of which parts of the schematics corresponded to which parts of the physical radio in front of me.
The basic design of a radio is to take AM radio waves, demodulate them to get the original audio signal, amplify that signal, and play it. Given this, my plan was to connect the computer audio output with an AM modulator, feed it into the radio circuit, and call it a day. I spent quite some time reading up on AM circuit design and trying to feed it into the radio, but I wasn’t able to get anything to play.
After many frustrating false-starts, I connected the AM-modulated output to a part of circuit I hadn’t tried yet, and was able to hear a recognizable song through the speaker, although the sound quality was terrible. I kept trying different setups for the AM-modulation, until finally I just tried connecting the sound source directly, and eureka! The sound came out crystal clear. Somehow, despite not really knowing what part of the circuit I was attached to, I had found a way to deliver audio directly into the radio’s amplifier circuit, so I didn’t need to deal with modulating the signal. Feeling exceptionally lucky and relieved that I could now play audio, I wired up a USB wall-wart to the radio’s power supply, plugged in the C.H.I.P., and had a basic proof-of-concept:
Playing pandora via the radio
With the audio output now taken care of, I turned my attention to how to read the input from the dial. I wanted to use as much of the original internals as possible, so I decided to try to read the capacitance of the radio’s tuning condenser as an indicator of the dial’s current position. Capacitance is very difficult to read directly, so I hooked up the capacitor with a 555 timer configured as an astable oscillator. As the dial turned, the capacitance increased or decreased, creating a corresponding change in the frequency output of the 555 timer circuit. I tried to use the computer to read this frequency, but even using hardware interrupts, the accuracy of the timing was terrible. So instead I fed the frequency into a CD4040B 12-bit counter, which I polled every 100ms. Reading 12 counter bits took a lot more wires, but was able to read the frequency - and therefore capacitance, and therefore dial position - much more accurately. I sauntered together the small capacitance-reading circuit onto some protoboard and hooked it all together. I could now run a simple python program on the computer to play different songs based on the dial position!
Changing songs by turning the dial
At this point, the hardware was essentially completed, and I turned to focus on the software. Again, lots of false starts here, at one point having to essentially start over when I switched to using the Rasberry Pi instead of the C.H.I.P. because I needed multiple cores. Ultimately, I ended up with the following setup:
The main program is a python application that reads the GPIO to determine the current tuner position, and loads the corresponding station. When activated, each station selects a song from its designated folder on the computer, and signals to mpg123 to play the specific file. When the station changes, the program signals to mpg123 to play a different song, and keeps track of the offsets to make it seem like the stations continued to play even when you moved to a new station.
A second mpg123 process plays a file of pink noise on loop, which the main program fades in or out to create the illusion of static space “in between” stations. Each station had a frequency that was its center point, and static was blended in as you moved away from that center point towards a different station. I found cubic easing felt best.
A background process runs a modified version of Pianobar that keeps the content of the different folders “fresh” with music from different Pandora stations. Originally I was going to stream directly from Pandora, but that wouldn't have been able to seek/pause/play music with the control I needed to create the illusion of “persistent” radio stations.
There is also one specific AirPlay station that enabled AirPlay and stops playing all other music.
Everything is configured to start up immediately upon boot, and conveniently the Raspberry Pi is able to boot up and launch the program faster than the radio’s vacuum tubes warm up, so there is no noticeable “boot up” time. Plus, as the tubes warm up it creates a nice “fade in” effect on the audio coming out of the Rasberry Pi.
Reflections
This ended up being quite an ambitious project - because it was a labor of love, I ended up putting a ton of work into the small details like blending static between stations and using the original condenser as the input. The way everything came together made it all worth it, though - the radio is hands-down the coolest project I’ve ever made.
My favorite use for it is listening to it when I'm in my room reading or working on a project - I can just turn it on and enjoy. Plus, the warm sound and physical nature of the interface makes it such a fun product to use. After my experience with the radio and the SoundByte, I’m convinced that physical interfaces offer a much more pleasant experience than digital interfaces - they just take quite a bit more effort to make work.
After working on the project off and on for the better part of the year, I gave the original model shown above to my dad for his birthday. I miss it, so I’m now working on retrofitting a second radio for my own use.